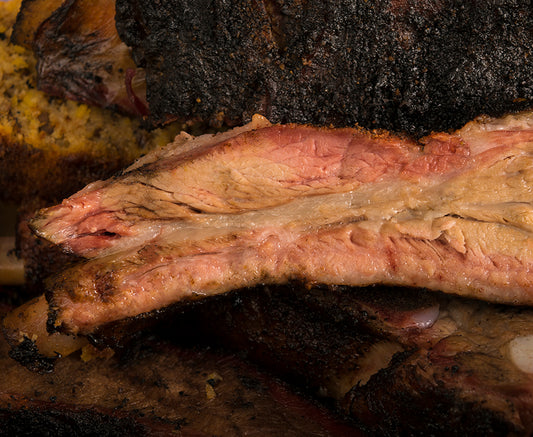

Brisket is a universally loved cut of meat among smoked food lovers. There is nothing like biting a piece of tender, succulent, flavorful brisket that has been smoked for more than 12 hours. Because of this prolonged smoking, this piece of steak absorbs intense smoky flavors. The other thing that adds to the mouth-watering taste of this cut is the seasoning. Like the smoking process, seasoning brisket is an overnight affair and requires some skill. This is why you will always come across articles online that detail how to season a brisket rather than what to put on it.
This guide intends to help every beginner at food smoking pull off a perfectly smoked sizzling brisket on the first attempt. We will share some fool-proof tips on not only seasoning brisket but also an easy-peasy recipe that will make smoking brisket a breeze. So, keep reading.
Tips to Smoke Brisket Like a Pro
We have broken the process into small steps to make it easily understandable for beginners at smoking. Here we go.
1. Meat selection: never settle for anything less than fresh raw brisket. It should have good marbling to absorb maximum flavor during seasoning and smoking.
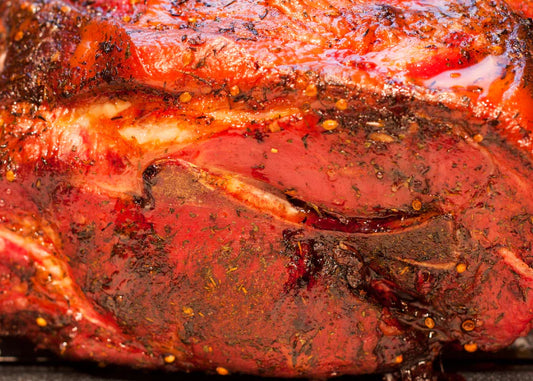
2. Trim off excess fat: This will reveal the brisket’s bright red color, making the cut of meat equally appealing in appearance and taste.
3. Dry rub: This is an important step to enhance the flavor. You can use any rub available on the market or simply smear the brisket with a mix of salt, pepper, and garlic powder. You can also follow the recipe provided below.
Interested in checking out more information about meat rubs? Look no further than our articles on:
3 Homemade Rubs to take Your Smoked Chicken to the Next Level
Famous Rub Types Paired with Delicious Recipes
What is a Rub, Why and How to Do It?
4. Refrigerate: Let the seasoned brisket sit in the refrigerator or cooler for at least 6 hours. That will help the seasoning to be absorbed, and get an extra flavor on the inside and not only on the exterior bark.
5. Placing it on the grid: If your food smoker generates heat from the bottom, then it is better to place it on the grid meat side down and fat side up. As the fat starts to melt and secrete juices, the liquid will seep into the brisket throughout the smoking process, keeping it moist and tender.
6. Wrapping: If you are smoking the brisket in less time, wrap foil three-fourths of the way around the brisket to avoid the meat drying out. But if you have at least 12 hours to smoke the brisket, then cook it unwrapped.
Here the final result will be interfere, wrapped brisket will have more moisture and a not that crispy bark. While the unwrapped one will release more moisture from inside but keep that seasoning bark intact.
7. Temperature is key: You have to maintain consistent heat inside the smoking chamber. If you are using an offset smoker, then it might be difficult to gauge the heat generated by wood logs or chips. However, this will not be an issue with a modern electric food smoker like the Bradley Smoker. The Bradley Smoker has a digital console to enable you to preset cooking time and temperature. When the Bradley Smoker is used with Bradley Bisquettes, your food smoker will smoke your meat just how you want. Bradley Bisquettes are compressed wood chips that burn for a precise time, generating flavorful and pure smoke to flavor the meat without the foul taste of ash, as they are extinguished before that point.
8. Checking doneness: Use a meat thermometer to check if the brisket has reached the desired doneness. After the brisket is cooked, take it out of the smoker and let it rest before slicing and serving it.

Recipe for Seasoning Brisket
This recipe has simple ingredients that are normally available in every kitchen. Even if you are getting started with food smoking, it will be easy to pull off this recipe.
Ingredients:
- Black pepper
- Granulated garlic
- Granulated onion
- Fajita seasoning
- Citrus herb rub
Method:
1. Start by putting a rack on top of a pan.
2. Gently place the brisket on the rack.
3. Smear salt on the surface and the sides.
4. Now mix the remaining ingredients and rub them on the top and all the sides of the brisket.
5. Flip the brisket and repeat the same on the other side. Remember to put a layer of salt first and then a layer of the dry rub.
6. Cover and refrigerate overnight.
7. About half an hour before smoking the brisket, take it out and let it rest on the counter to warm up a little. You will notice some liquid at the bottom of the pan, and that’s perfectly fine.

While wet brining is believed to produce amazing results, dry brining yields more flavorful results, you can try it yourself and thank us later. While you have complete freedom to choose a store-bought seasoning to flavor your brisket, making one at home that perfectly suits your taste buds is a different kind of experience.
With that, we’ve come to the end of this article on seasoning beef brisket like a pro. We hope these Bradley tips & tricks on food smoking and seasoning brisket have been helpful to you. So the next time you decide to organize a barbeque session at home, surprise your friends and family with perfectly smoked, sizzling, and succulent brisket.
Interested in more articles about seasoning? Check out our entire catalog of articles on brining and curing your meat here:
What’s the Difference Between Pickling, Brining, Marinating, and Curing?
Curing and Smoking Meats for Home Food Preservation
Directions On Brining And Curing Your Meat For Food Smoking
For more great ideas on how to get the most out of your Bradley Smoker, check out the awesome articles on our Bradley Smoker Food Smoking Blog for more tips & tricks.